tutorial

DIY, Eco, In the Kitchen, Sustainable Home Life, Tutorials

Make your Own Kitchen Cloth: Part 2

Earth day is almost here. Want to make a small change in your life that will lessen your carbon foot print? This is part 2 of crocheting your own dish cloth. Part 1 is right here I’ve been using Blue Sky Organic Worsted Cotton but you can use any sort of worsted weight. I like this cloths because it is pretty absorbent. Materials: size J crochet hook

1 skein worsted weight cotton

Instructions:

  1. after chaining 26 you will need to start working back.

2. Insert hook into the second loop from the end.

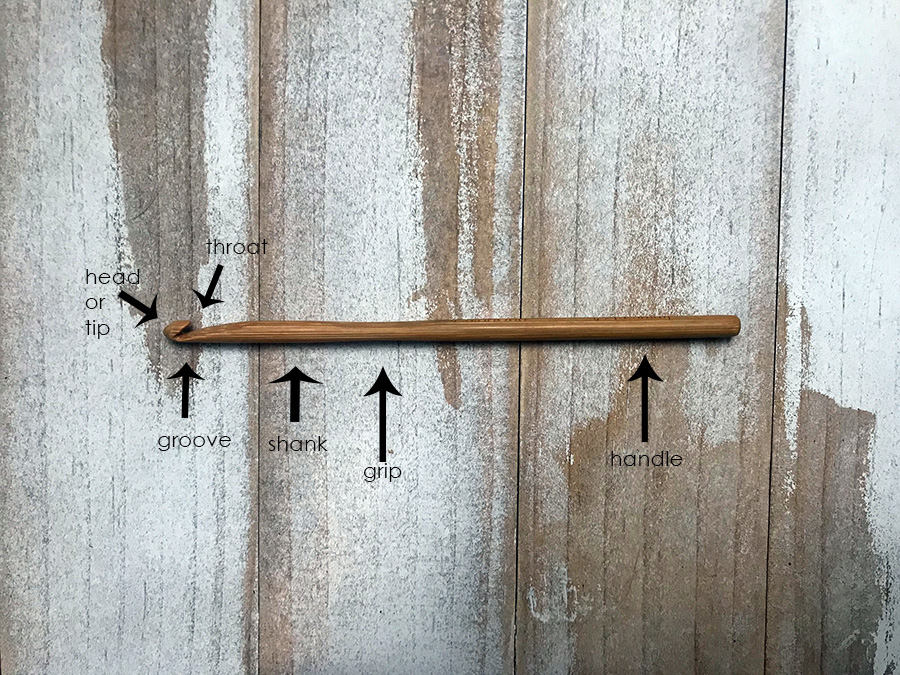
3. Wrap yarn around hook towards you and under the throat. What’s the throat? See below diagram.

Step 2 make sure on top of the hook you see these two yarns, this stitch. This way you know you did not insert into the wrong section.

step 5.

4. Now there are 2 loops on the hook.

5. Wrap yarn towards you around hook and pull thru both loops. You are back to one loop on the hook. Repeat steps 2 thru 5 until end of row.

6. At end of row the last stitch can be tricky. The entry is a bit tight. See circled stitch below.

Step 6.

Step 7. This is also a single crochet.

Once you reach 5” high begin to bind off.

Step 1. Insert hook into loop as if you are creating a single crochet.

Step 2. With 2 loops on the hook pull the furthest loop from the head over the first loop and off the hook.

Step 2.

You are left with one loop on the hook. Repeat above steps until you reach end of row.

Step 3. You have reached the end with one loop on the hook. Cut your yarn from the main ball and pull thru the loop.

Step 4. Pull the tail thru the stitches 3 or 4 times. You can use a darning needle for this.


One of my favorite table top cleaners is from Common Goods that I get refilled army local General Goods Store, Annies Blue Ribbon.

Now get cleaning!

And to wash this cloth, just throw in with your other towels. I wash everything on cold and tumble dry or line dry.
Would love to hear and see what you made. What yarn did you use?

Thanks for reading and Happy Earth Day!

Tracey

DIY, Tutorials, Sewing

DIY: House Appliqué Tea Towel Tutorial

In my last post I talked about scrap bags and the many projects you can do with a scrap bag. In this post I will teach you how to make one of those projects.  If you want to just go and buy a scrap bag you can visit my Etsy shop. They are packaged in 5 ounce bags for $5.   This is a great beginner project or a project to do with kids.  It's teaching them to use up scraps, lets not waste the fabric and be eco minded . You can buy a blank pre made dish towel or make your own, or use one you already have.   Kids can play around with the design of the layout of the houses, add grass or cement colored fabric to the border, doors can be added to your houses or not.

1. Supplies: Scissors, pinking shears (optional), cotton woven fabric scraps ranging from 1" to 3",  pins, sewing machine or you can hand sew, iron, pieces of felt (optional), dish towel

2. Iron your fabrics. Cut out your houses that are sized from 1" to 3". Cut out your roofs that are 1" to 1 1/2".  I cut mine out with pinking shears and also made my roofs slanted.  For the front of the houses I used a strip of mushroom printed fabric to represent the forest. I am dreaming of a farmhouse some day. 

photo from escape brooklyn

3. After cutting out your houses lay them out on the towel for placement, pin them into place.  I left the edges exposed.  Add any little doors or windows if you want, size should be no bigger than 1/2". I used hot pink wool felt scraps for my door.   Even space them out.  A little trick to make sure your center house is centered is fold the towel in half lengthwise and press with iron.  Place your middle house on this crease.  Things don't need to be perfect, it is a little village. 

4. Zig zag or straight stitch. For my houses I zig zag stitched, and for the roof I cut out with pinking shears then straight stitched.  For zig zag the setting is width of 4 and length of .5. As you sew around the houses you can sew the door on, then continue onto the bottom of the house. 

finished towel

After you complete the sewing, iron once again. All set for your stove, dish rack, or a gift. 

Enjoy!

Tracey

Tutorials, Sewing, DIY

DIY: Sew a Tote this weekend!

Happy Friday! I am blogging for EtsyNy today and wanted to share this post with you.  This is a great project for someone who has learned to sew and wants to learn a few more techniques.  This is a lined bag with an interior pocket and sturdy cotton handles.  100% cotton! 

You can not only use the bag for apple picking but a trip to the farmer's market to pick up some other veggies! Full instructions are on EtsyNY's blog.  Just

Have a great weekend!

Tracey

It's National Sewing Month! DIY: Tutorial

Today you can find me blogging for the Etsy New York Team, click here to get to their site.   September is National Sewing Month. And no this is not a new thing, President Ronald Regan enacted it in 1982 to honor the importance of domestic sewing.  And that's domestic as in home and here on US soil.  I teach sewing part time.  Occasionally you will find I also do diy and tutorials on my blog and other blogs.  So in honor of National Sewing Month I created this project that is perfect for an intermediate beginner, doesn't take long, can use up your scrap fabrics and is perfect for the new season.

By the way, the First Day of Autumn is Wednesday the 23rd.  Enjoy!