diy

DIY, Tabletop, Tutorials

Quick Napkin Ring: Making a Simple Heart Paper Chain

Are you having an at home dinner date for Valentine’s Day? This is a quick and whimsical way to add a little love to your table decor. Combining work and spending time with my daughter who also loves to craft, we came up with making some simple heart paper chains to decorate our house and door for Valentine’s Day. And I added them to our table for some decoration. You can cut them in different colors, using any paper and some clear tape. Attach them to a door, lay them out on a table or string them along a window. There really is only one little trick, which I will get to.

Supplies:

-construction paper or any other paper, we used construction and origami because that’s what we had, try printer paper

-paper scissors

-tape

  1. With your piece of paper you are going to fold about 1” wide accordion style, so back and forth. Make a fold then fold this fold backwards making a second fold.

outline the heart you want to cut.

circle part is not cut.

After you fold the accordion you will draw the heart line that you will cut. Now here is the trick, you cut to the fold but do not completely cut on the line around the curve of the heart. This little section is not cut, this is what creates the chain link. I looked up a few tutorials and none of them mentioned this important secret.

that little piece of chalk is the part not cut.

Do a few of these and tape the edges together. You will always end up with a half heart on the end. Connect this to the next chain.

Hang them on a door, window, make a napkin ring from them or you can lay them around your dinner plates.

Enjoy!

Tracey

DIY, Eco, In the Kitchen, Sustainable Home Life, Tutorials

Make your Own Kitchen Cloth: Part 2

Earth day is almost here. Want to make a small change in your life that will lessen your carbon foot print? This is part 2 of crocheting your own dish cloth. Part 1 is right here I’ve been using Blue Sky Organic Worsted Cotton but you can use any sort of worsted weight. I like this cloths because it is pretty absorbent. Materials: size J crochet hook

1 skein worsted weight cotton

Instructions:

  1. after chaining 26 you will need to start working back.

2. Insert hook into the second loop from the end.

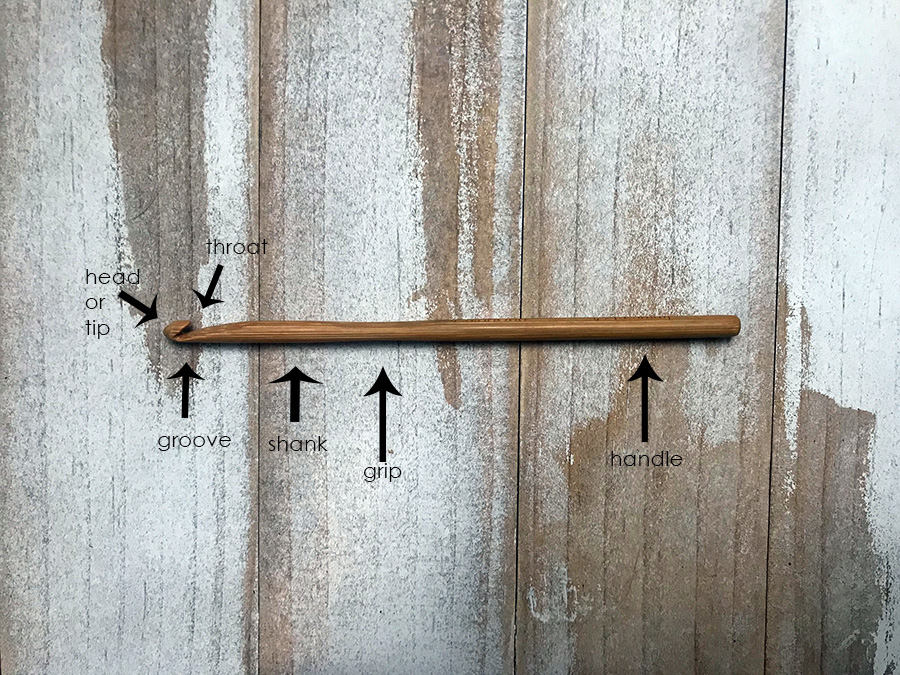
3. Wrap yarn around hook towards you and under the throat. What’s the throat? See below diagram.

Step 2 make sure on top of the hook you see these two yarns, this stitch. This way you know you did not insert into the wrong section.

step 5.

4. Now there are 2 loops on the hook.

5. Wrap yarn towards you around hook and pull thru both loops. You are back to one loop on the hook. Repeat steps 2 thru 5 until end of row.

6. At end of row the last stitch can be tricky. The entry is a bit tight. See circled stitch below.

Step 6.

Step 7. This is also a single crochet.

Once you reach 5” high begin to bind off.

Step 1. Insert hook into loop as if you are creating a single crochet.

Step 2. With 2 loops on the hook pull the furthest loop from the head over the first loop and off the hook.

Step 2.

You are left with one loop on the hook. Repeat above steps until you reach end of row.

Step 3. You have reached the end with one loop on the hook. Cut your yarn from the main ball and pull thru the loop.

Step 4. Pull the tail thru the stitches 3 or 4 times. You can use a darning needle for this.


One of my favorite table top cleaners is from Common Goods that I get refilled army local General Goods Store, Annies Blue Ribbon.

Now get cleaning!

And to wash this cloth, just throw in with your other towels. I wash everything on cold and tumble dry or line dry.
Would love to hear and see what you made. What yarn did you use?

Thanks for reading and Happy Earth Day!

Tracey

DIY, Eco, In the Kitchen, Sustainable Home Life, Tutorials

Make Your Own Kitchen Cloth - DIY tutorial - Part 1

For the past few months I have been carrying a project bag in my purse. Harper is now 5, so after school pick up we usually head to the playground. She plays, I sit and crochet. Also, this uses up small amounts of yarn and is a small enough project to carry around. I’ve been using organic Blue Sky worsted cotton. It’s incredibly soft not to mention eco friendly. So if you want to make someone a housewarming gift or new baby gift these cloths are perfect. They make great wash cloths, so soft on the skin and feel so durable. I use a few for my face cloths, Harper uses some in her bath and now I am making crocheted ones for the kitchen.

Ok so THE CONS: I do realise that sometimes a knitted or crocheted cloth won’t scrub like a sponge. It may not provide the scrub one needs on a soup caked pot. For that I will use my spaghetti scrub that I mentioned in my last post.

Another CON: at first I had a hard time using nice cotton for the kitchen, but honestly it’s nice because it’s durable, good for the environment and fair trade. So I should just get over myself and use the beautiful cotton yarn. I bought the yarn for these reasons.

PROS: you get to use up all your scrap and leftover yarn, you won’t be buying sponges anymore and you get to do some crafting. t

I experimented with a few size hooks, the same yarn and the same pattern with a little variation for size of the cloth. I used 2 hooks, a size J, 6” by Addi and Chiao Goo bamboo hook in 5.5 mm.


INSTRUCTIONS, Part 1:


1. Make your foundation chain of 26 stitches. Make a slip knot with your yarn, looks like a pretzel. With your right hand pull the yarn tail over the rest of the yarn, create a loop. The left side lays on top of the yarn and the tail part will lay under the right side of the pretzel.

Make your slip knot, notice that the tail right side is under the yarn.

Step 2, slide hook into pretzel knot.

Pull slip knot on hook by pulling the two tails.

Slip knot hugging your hook, time to start the chain.

Starting the chain. With your left hand, ring finger and thumb hold the slipknot, the yarn is over your index finger. With your right hand, hold the hook and the yarn on the hook. Wrap yarn over (yo) and under the hook, then slide loop that’s on the hook over the tip and the yarn you just wrapped over. This is one stitch of the chain stitch. Continue this for 26 stitches. I have done the sample in green but the actual cloths I made are in white and pink.

After chaining 26 it should look like this.


In the next post I will continue to show you the pattern of making the dishcloth.


DIY, Tutorials, Sewing

DIY: House Appliqué Tea Towel Tutorial

In my last post I talked about scrap bags and the many projects you can do with a scrap bag. In this post I will teach you how to make one of those projects.  If you want to just go and buy a scrap bag you can visit my Etsy shop. They are packaged in 5 ounce bags for $5.   This is a great beginner project or a project to do with kids.  It's teaching them to use up scraps, lets not waste the fabric and be eco minded . You can buy a blank pre made dish towel or make your own, or use one you already have.   Kids can play around with the design of the layout of the houses, add grass or cement colored fabric to the border, doors can be added to your houses or not.

1. Supplies: Scissors, pinking shears (optional), cotton woven fabric scraps ranging from 1" to 3",  pins, sewing machine or you can hand sew, iron, pieces of felt (optional), dish towel

2. Iron your fabrics. Cut out your houses that are sized from 1" to 3". Cut out your roofs that are 1" to 1 1/2".  I cut mine out with pinking shears and also made my roofs slanted.  For the front of the houses I used a strip of mushroom printed fabric to represent the forest. I am dreaming of a farmhouse some day. 

photo from escape brooklyn

3. After cutting out your houses lay them out on the towel for placement, pin them into place.  I left the edges exposed.  Add any little doors or windows if you want, size should be no bigger than 1/2". I used hot pink wool felt scraps for my door.   Even space them out.  A little trick to make sure your center house is centered is fold the towel in half lengthwise and press with iron.  Place your middle house on this crease.  Things don't need to be perfect, it is a little village. 

4. Zig zag or straight stitch. For my houses I zig zag stitched, and for the roof I cut out with pinking shears then straight stitched.  For zig zag the setting is width of 4 and length of .5. As you sew around the houses you can sew the door on, then continue onto the bottom of the house. 

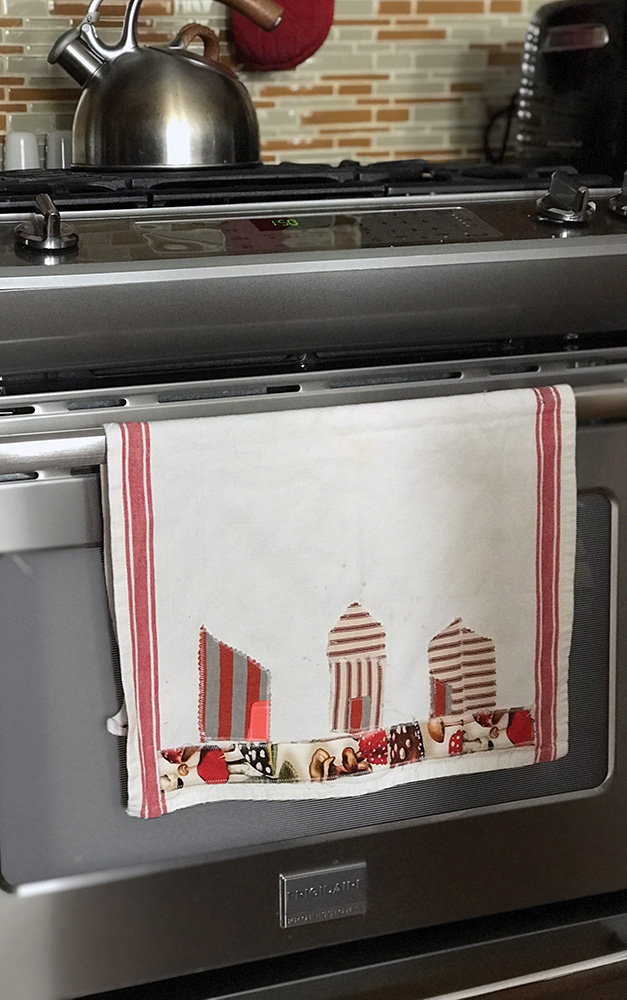
finished towel

After you complete the sewing, iron once again. All set for your stove, dish rack, or a gift. 

Enjoy!

Tracey

Tutorials, Sewing, DIY

DIY: Sew a Tote this weekend!

Happy Friday! I am blogging for EtsyNy today and wanted to share this post with you.  This is a great project for someone who has learned to sew and wants to learn a few more techniques.  This is a lined bag with an interior pocket and sturdy cotton handles.  100% cotton! 

You can not only use the bag for apple picking but a trip to the farmer's market to pick up some other veggies! Full instructions are on EtsyNY's blog.  Just

Have a great weekend!

Tracey