

A year has gone by and we are still wearing a mask to protect ourselves from Covid. The CDC is now recommending wearing two masks. There are many mask patterns out there and I have tried a few. I worked in the garment industry and for mass manufacturing and I have learned to be efficient with time and materials. This pattern gets the job done. It really doesn’t take much fabric to make a mask. But if it’s time to clean out your stash this is a practical way to utilize fabrics. If you are a beginning sewist this is a great way to practice your topstitching, small seam allowances, pleats, folds and attaching ties or elastics. And this is a free pattern that I have been using for a year selling 1,000s of masks. It is based off of a mask distributed by Deaconess Hospitals in Indiana. I have tweeked the pattern a bit for construction purposes but it is still as beneficial as the original.
The best fabric to use for a mask is quilting weight cotton. Quilting weight cotton is a medium weight cotton that is not light or heavy like a denim or canvas. Think of a quilt blanket you might have or your favorite button down shirt. The top fabric used is of medium weight, about 4 oz per square yard. Most of my masks are made with Liberty of London Tana Lawn which is lightweight, about 2-3 oz per square yard, but a very tight weave preventing those nasty droplets from coming thru. For your liner it’s best to use another tight weave cotton. I use a 200 count muslin. This is unbleached and similar to bed sheets, the higher count the soft the fabric but also 200 count means there are 200 threads per square inch. A nice tight weave fabric. Another plus for using higher quality cottons is less shrinkage. Quilting cottons such as Kona or Liberty of London hardly shrink, if at all.

So if we have to wear a mask might as well wear one that we like. Practice your sewing skills and you can also make for your loved ones or homeless shelters.
Have fun!
MATERIALS
1 10” X 8” piece of quilting weight fabric
1 10” x 8” piece of muslin fabric or other quilting weight fabric
2 pieces of elastic 7” each or 2 adjustable nylon stretchy ear wraps
matching cotton or poly thread - machine friendly or TEX 440 which is what I use
Iron, pressing mat or ironing board
point turner (or chopstick)
pattern
pins / scissors / measuring tape or ruler
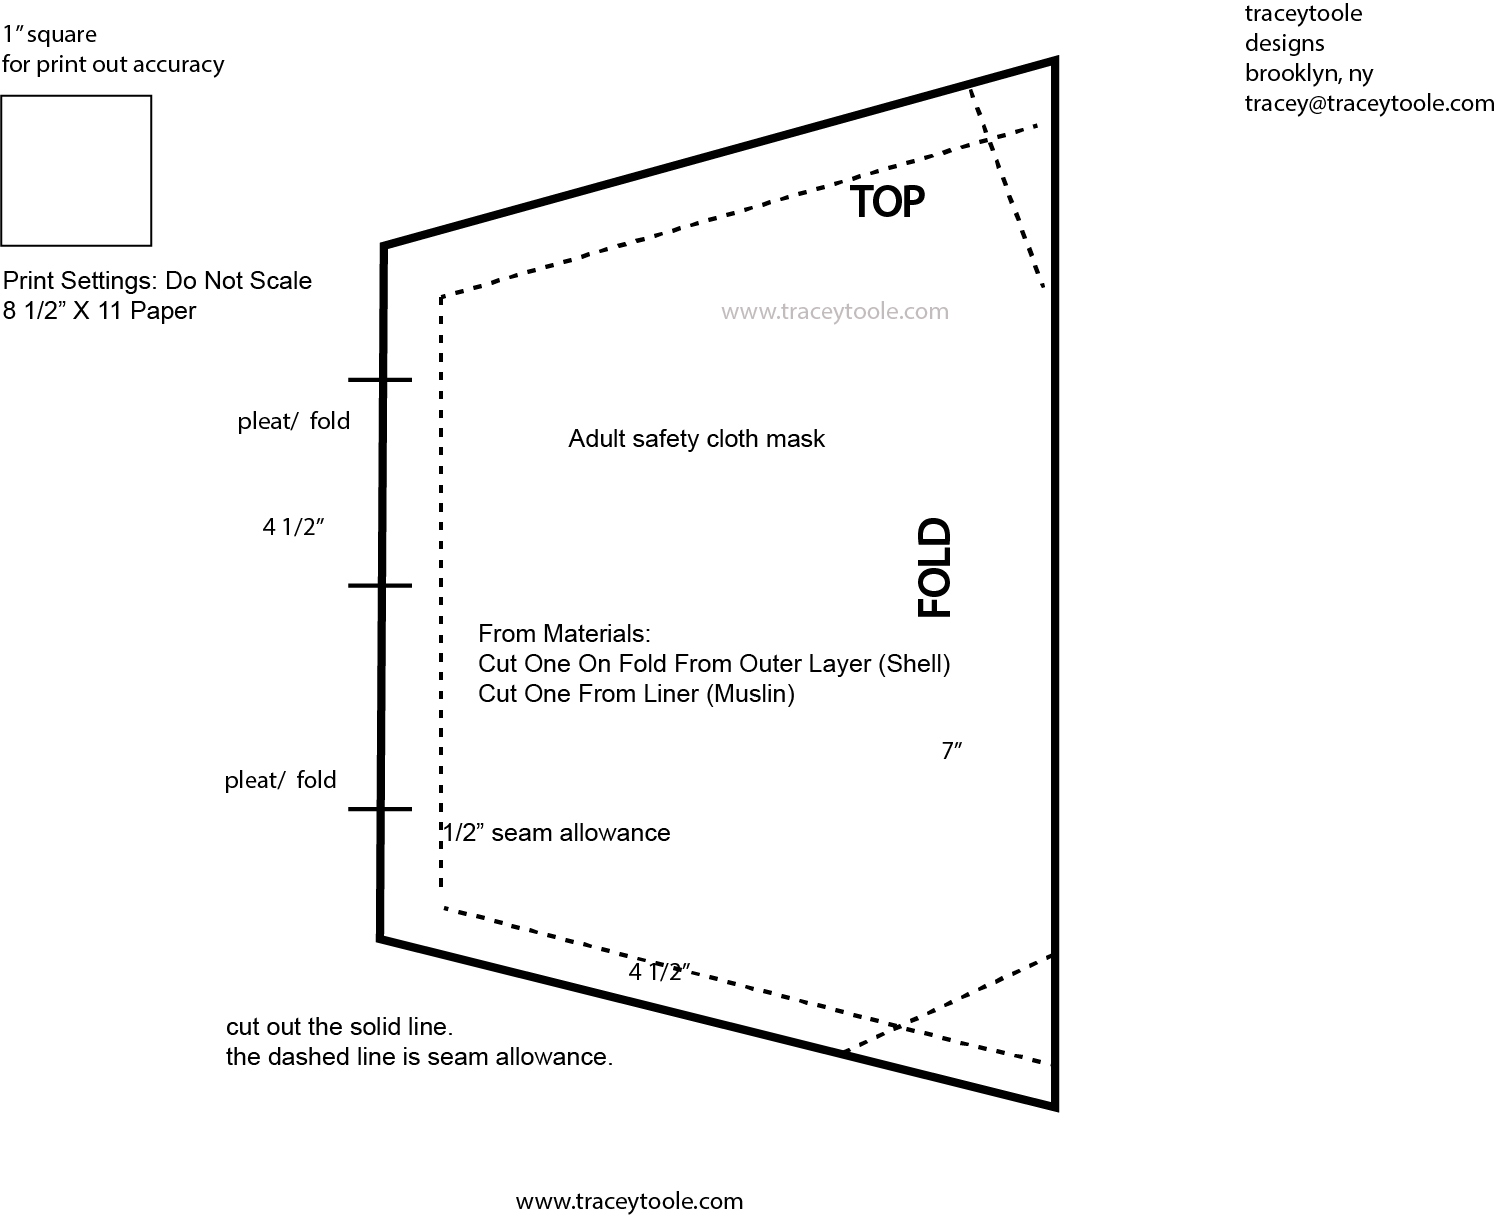
Print out pattern here in landscape format and cut out along solid black lines. Remember to click the “do not scale” button on your printer menu.

1. Prewash fabric and dry. Iron out wrinkles. Cut one 9” x 7” rectangle from the outer fabric and one rectangle from your liner fabric.
2. If your fabric is a print it has a face or front side. Lay outer shell face to face of liner. If your liner is a muslin or solid colored fabric there is no face so either side will work.
3. Fold fabric and lay your pattern piece where it says fold to the fold of the fabric. It should be laying right on the edge of the fold. If your print is a directional print make sure the fabric is laying on the paper pattern the correct direction. See pattern for top and bottom


4. Trace pattern, mark pleat lines. Cut out.


5. Fold short edges (4 1/2”) side over towards back side 1/2”. See below. You are folding these over before sewing so at step 7 when we turn the fabric right side out the raw edges are already turned in and hemmed.

Step 6 - sew 3/8” seam allowance along longer sides. Do not sew across short sides.
6. With a 3/8” seam allowance sew along the long (9”) sides. Your short edges will stay open, 3/8” folded over towards the backside (see photo) I have pinned the middle of the fabric to prevent shifting.
7. Iron and turn right side out. Iron and steam. The short sides will be folded in from having them folded inward in step 6.


Step 8 -pleats
8. With tailors chalk or your washable pencil transfer from the pattern the pleat and dart lines on the back side of fabric. Darts will be at the top and bottom of the mask, the folds or pleats will be on the sides. On the back side of the mask at the pleat lines starting from the bottom pinch about 1/2” and fold up, pin. Once you have 6 pleats pinned it’s time to move on to the darts. Fold fabric in half open side to open side, you want to be able to see your traced lines from the darts. If you are an intermediate sewist you can skip this next sentence. BEGINNERS: starting at the top dart furthest away from the seam stitch this dart down back stitching at beginning and end. Move on to the bottom dart repeating same steps. It’s important to sew the darts first since they add shape to the mask. The picture above shows the top dart and bottom dart with the trace lines from the pattern. Once everything is pinned down, steam press with your iron.

9. Time to insert your elastic or nylon ties. Elastic should be cut at 7” . You can use cotton ties here, you will need 4 cut at 16”. I am using nylon stretch adjustable ties that we include in the kits sold on traceytoole.com Insert each end into the corners and pin down.

10. Time to sew and finish this mask! Mask front side up, start sewing at a corner. For security I back stitch at each corner re-enforcing the ties. When you sew the darts down they must fold the same direction. Normally you sew them down towards whatever side they lean towards.

Once you have sewn around clip the threads and wear! These can be machine washed and tumble or line dried. Let me know if you have any questions! Feel free to add to the comment section or email tracey@traceytoole.com Thank you!
