DIY, Fabrics, Sewing

Scrap Bag Crafts: Projects to Make with Fabric Pieces

It's hard for me to throw away fabric. I looked, I chose and I purchased. Most of it I love. I pick up a piece and usually think what can I do with this little scrap. I don't want to waste. I don't want the fabric to end up in a landfill leaking inks into our earth.  But clean spaces equals clean minds. So I decided to turn my scraps into scrap bags and I will pass on these fabrics to you.  Not large ones, but a small 5 ounce bag.  It's not too much of an investment so you can buy as many as you need.

So what comes in these bags?  Scrap bags come in quilting cottons, denims or canvases. Everything is cotton or cotton linen.  No scrap is smaller than 2" wide. That's my rule of thumb.  Therefore if you are a quilter it can be used for patchwork. Whatelse can you do with scraps? I compiled a list with links.  

passport cover from Sugar and Cloth

1. Super cute passport cover from Sugar and Cloth.

Modern pincushion from Canoe Ridge Creations

2. Pincushion - this modern pincushion is a great intro project into quilting, from Canoe Ridge

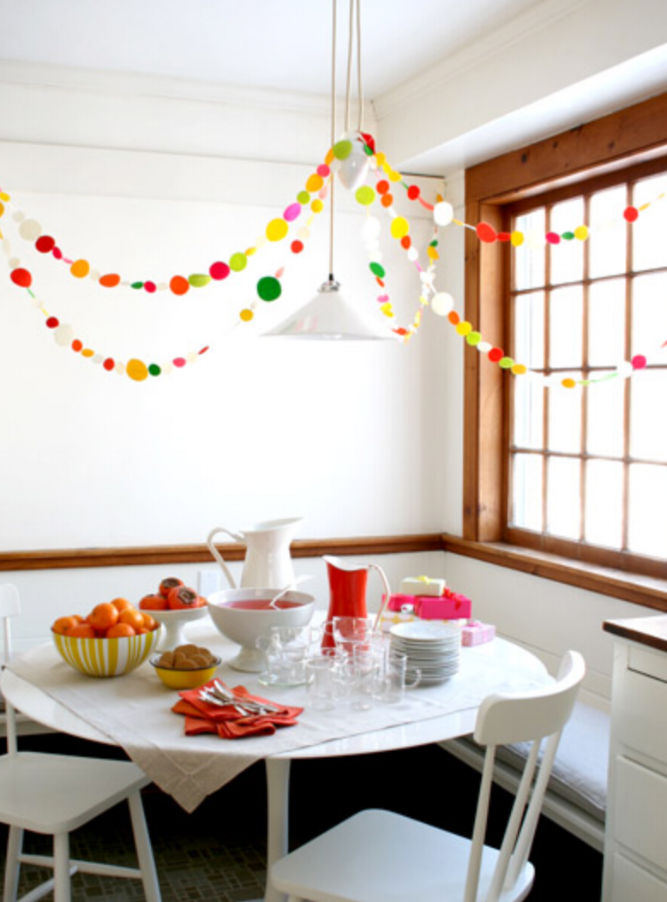
3. Bunting / Garland - good for any sort of party, kid's bedroom or playroom or a classroom.  This one is from the Purl Bee and uses felt.  Fabric can easily be substituted.  I did something similar with felt, backed with fabric in my daughter's name. 

4. Appliqué design on tea towels - This next one is a cute idea for a housewarming gift.  I taught this to some students for a Mother's Day gift. It's an easy and quick project for young learners. They also get to be creative with designing the layout.  You can buy some toweling fabric at most fabric and craft stores which saves some time sewing the towel.

from Martha Stewart quilted coasters

And for #5, however the list can go on. Coasters. The scrap bags I make are color coordinated so you can make a set of fabric coasters that complement each other. A great house warming gift or gift for yourself.  Martha Stewart has an easy tutorial.  These are quilted but you don't need to do that. 2 rows of stitching around the edges are enough.  

Off the top of my head some more ideas are:  ornaments, fabric flowers, glasses, buttons, barrettes, zip pouch, fabric necklace, kids belts, napkin rings, memory game chips.  So many diy projects, so little time. But the fabric won't end up in the landfill. To buy some scrap bags you can visit my Etsy shop or email me tracey@traceytoole.com  and I would love to see what you make! I find when given restrictions we can create so many interesting things.

Happy New Year!

Color, Inspirations

Autumnal Inspirations

A little town called Hopewell Junction, October 2017

If you are like me or most people Instagram is total eye candy.  I've been saving some of my likes on instagram, I think when I do look back at them I can smell the crisp leaves.  I've been mentioning this to my daughter lately.  Do you smell the leaves? This past weekend we drove upstate and at one point I pulled the car over so we can walk in the leaves, and smell the change of seasons.  It's so refreshing and relaxing.

Better Homes and Gardens

Martha Stewart

I Spy Diy

The photo above from I Spy Diy, a blog and website of diy projects is filled with inspiration! The style and colors are usually modern with pops of brights and neons.  This photo I particularly love because of the soft shades of autumn shown.  Instead of the bright, and deep shades she shows the subtle, soft faded and burnt shades of autumn.  It's so quiet and beautiful. 

Domino Mag

This photo is from Domino Magazine on Instagram. This is a popular trend here in Brooklyn.  People are decorating the door steps and stoops and you are asked to use the garden level entrance.  This sort of decorating makes it look so bountiful. 

Have you been getting inspired by fall foliage and pumpkins everywhere? 

Tracey

Aprons, Market

Fall Market Sunday October 8th

So Sunday October 8th is my wedding anniversary, what better way to spend it then working in the first big market of the season! My husband was understanding. You can also come by and visit, pick up some fall picnic blankets, napkins for Thanksgiving or a new apron for the holiday cooking coming up!

This market is in Manhattan in the Upper Westside at 77th and Columbus.  The group that I am part of, the NY Handmade Collective, has joined together with Grand Bazaar NYC.  There will be about 30 Etsy NY vendors.  Hope to see you there!

Tracey

Aprons, Inspirations, Tuesday's Apron

Vintage Aprons

I am always interested in seeing older aprons, be it 20 years or 50 years.  Inspiration comes from all places and to see the fabrics, the style and the fit of aprons from the past gives me ideas or sometimes a laugh or wonderment.  Delicate pockets, frilly trims, ruffles, sheer fabrics, reused fabrics, flour and grain sacks, every apron tells a story. Women wore aprons in the home all day to protect their clothes while they tended to their chores and duties.  The thought of this makes me shake my head but those were the times. I won't glamorize or romanticise it.  I think it must have been a very difficult and not a very satisfying life for most. On the other hand, it may have been very satisfying and fulfilling for some women.  

 I received an email newsletter the other day about vintage aprons from Threads Magazine. The writer found a collection of aprons in her parent's house.  The collection is varied, functional and pretty.  As I start a new season of design and making, this article inspired me to pull out some of my vintage apron books. 

from the book Aprons by Joyce Cheney, a 1940's apron. Very wearable today in 2017.

This apron is genius! Perfect for bathing a new baby. Terry cloth is sewn on top of the apron.  From the Apron Book by EllynAnneGeisel

The best for last, a Kitty Apron. The date is not given but looks like a 1940's or 50's graphic on the apron. Also from the Apron Book by EllynAnneGeisel

Have a great weekend!

Tracey

Baking, In the Kitchen

The Best Granola

I know there are numerous recipes out there for granola. And a zillion choices to buy at the store but there is something special about making your own.  First it's super easy, two it's not that expensive to do, three you can do it with kids, four you know what you are putting into it, five filling your kitchen with a sweet and toasted seed smell is the best.

I've been experimenting with different recipes and this one I think may be the best. And coincidentally it is called the Best Granola. I think the secret ingredient which is not so secret, is the salt.  I also like the fact that you can mix it up and use what you have on hand.  Or don't have. 

The Kitchn has quite a number of granola recipes.  But this is my favorite. Click here to visit their website. 

Makes about 6 cups granola


Ingredients

3 cups old-fashioned rolled oats
2 to 2 1/2 cups your choice of nuts and seeds*
1 1/2 teaspoons kosher salt
1/4 teaspoon cinnamon
1/2 teaspoon cardamom
1/2 cup oil, such as olive oil
1/2 cup + 1 tablespoon liquid sweetener, such as honey or maple syrup
3/4 teaspoon vanilla
3/4 cups dried fruits, chopped

Note: Nuts that are already roasted should go in at the end after the granola is baked so as not to burn.

Equipment

Mixing bowls
Measuring cups and spoons
Spatula
Parchment
Half-sheet pan or baking shee

Instructions

1. Set out your ingredients: For this particular run of granola we are using: 3 cups old-fashioned oats, 1/2 cup pumpkin seeds, 1/2 cup sesame seeds, 1/2 cup almonds, 1/2 cup wide-flake, unsweetened coconut (added near the end of baking), 1 1/2 teaspoon kosher salt, 1/4 teaspoon cinnamon, 1/2 teaspoon cardamom, 3/4 teaspoon vanilla extract, 1/2 cup olive oil, 1/2 cup + 1 tablespoon maple syrup, 3/4 cup dried cherries, chopped (added at the end), 1 cup roasted pistachios, chopped (added at the end)

2. Preheat oven and mix dry ingredients: Preheat the oven to 350°F. Mix the oats and any untoasted nuts or seeds together in a large bowl. Stir to combine.

3. Mix in the spices: Add salt, cinnamon, and cardamom and stir thoroughly to combine.

4. Stir in the liquids: Stir in the oil, sweetener, and vanilla.

5. Bake the granola: Turn the granola out onto a parchment-lined half-sheet pan and bake for about 40 minutes, or until the mixture is light brown and toasty.

6. Stir the granola: Stir every 15 minutes or so for an even color and to make sure the granola is cooking evenly. (If using coconut, add in the last 15 minutes of baking.)

7. Prepare any late-addition ingredients: Roughly chop any dried fruits and roasted nuts being added after baking.

8. Stir in late-addition ingredients: Remove from the oven and add the chopped dried fruits and any roasted nuts at this time. Stir to combine.

9. Let the granola cool: Let cool before enjoying. The granola will continue cooking just a bit in the cooling process — it will firm up/dry out, so if it seems a little too wet don't worry.

10. Store the granola: Store in an airtight container and it should stay fresh for 7 to 10 days. For longer shelf life, store in the refrigerator.

Additional Notes:

1. Want Clumpy Granola? The key to getting chunkier granola is not to mix the granola as it's baking. Pat the wet mixture down into the baking sheet with the back of a spatula and don't mix it or disturb it while baking. Then, after cooking, you can remove it from the pan in granola chunks and store as indicated above.

2. Nuts and Fruits: I love working with sliced almonds, pecans, walnuts, pistachios, hazelnuts and sesame seeds. As for fruits, dried cranberries, cherries, apricots, raisins and currents are all great choices. Experiment with different combinations to find your favorite!

3. Consider Your Oats: Make sure to use old-fashioned oats for your granola, not quick-cooking oats. quick-cooking oats are less substantial and will cook differently and result in an almost dusty granola texture.

4. Bulk Spices: When buying spices for your granola, buy in bulk! It's almost always the freshest.

5. Mixing Techniques: While granola is absolutely a one-bowl affair, you want to mix all of your dry ingredients together before adding your wet ingredients so as to avoid clumping of salts and spices.

6. Don't Fear the Salt! Salt enhances the flavor of your granola — most people don't use enough of it! Use it.

7. Experiment with Savory Additions: I use olive oil for my granola which gives it a special toastiness. I also love using cacao nibs and a little extra salt, all of which result in an almost savory granola. Explore that savory edge!

I copied and pasted their recipe.  However the photos are all mine.  I have made this many times and make it different each time.  Enjoy! 

My favorite way to eat granola, fruit and yogurt combo!

Easy to take on the go using a mason jar.